Rails7に「Devise」を導入しようと思っていたのですが、Rails7のTurbo Stream の影響により、そのまま導入してしまうとエラーが出て動きません。
Devise公式によるとまだTurboには対応していないとのこと(アップデートが2021年12月で止まっている…Turboへの対応早う〜)。
そこで暫定の対処法について調べてみたところ、コントローラーをカスタマイズすればTurboに対応できることが判明。
ということで、さっそくDeviseをRails7のTurboに対応させてみたので、手順をメモとして残そうと思います。
開発環境
- Ruby 3.1.2
- Ruby on Rails 7.0.4
- Devise 4.8.1
- M1 Macbook Air 2020
- mac OS Monterey (ver. 12.4)
- ターミナル bash (Rosetta 2 使用)
Rails7に「Devise」をそのまま導入すると起こるエラーについて
現在の時点で Rails7(v7.0.4) に Devise(v4.8.1) をそのまま導入した場合、以下のようなエラーが発生することが確認されています。
- 新規登録(sign_up)時に「Undefined method ‘user_url’」エラー発生
- 新規登録(sign_up)時のバリデーションエラー時にメッセージが表示されない
- 「Error: Form responses must redirect to another location」
- after_sign_out_path_forが効かない
(この他にもエラーがあるかもしれません。今後もしあれば追記します)
エラーの詳しい内容については以下の記事が参考になります。

上記のエラー対策を行いつつ、Rails7へのDeviseの導入を進めていきます。
Deviseの導入手順
今回のDevise導入では、以下を前提に話を進めていきます。
- Rails7を使用(Turbo 有効化済み)
- ルートパス指定済み(home#top)
- メールサーバーはSendGridを利用(アカウント登録済み)
SendGridは事前のアカウント登録が必要です。登録における注意点もあるのでこちらで確認しておいてください。
SendGridのアカウント登録については以下の記事が参考になります。

Deviseのインストール
まずはGemfileに下記のように記述します。
gem 'devise'以下のコマンドでgemをインストールします。
$ bundle install続いて、以下のコマンドでDevise本体をインストールします。
$ rails g devise:installDeviseのインストールが完了すると、ターミナルに以下のような表示が出ます。
===============================================================================

Depending on your application's configuration some manual setup may be required:

  1. Ensure you have defined default url options in your environments files. Here
     is an example of default_url_options appropriate for a development environment
     in config/environments/development.rb:

       config.action_mailer.default_url_options = { host: 'localhost', port: 3000 }

     In production, :host should be set to the actual host of your application.

     * Required for all applications. *

  2. Ensure you have defined root_url to *something* in your config/routes.rb.
     For example:

       root to: "home#index"

     * Not required for API-only Applications *

  3. Ensure you have flash messages in app/views/layouts/application.html.erb.
     For example:

       <p class="notice"><%= notice %></p>
       <p class="alert"><%= alert %></p>

     * Not required for API-only Applications *

  4. You can copy Devise views (for customization) to your app by running:

       rails g devise:views

     * Not required *

===============================================================================
Deviseをインストール後の手順について書いてありますが、これら全て後ほど行うので現時点で気にしなくて大丈夫です。
「Undefined method ‘user_url’」エラーへの対処
Rails7ではデフォルトでTurbo Streamが有効になっているため、Deviseでsign_upを実行しようとすると、「Undefined method ‘user_url’」エラーが発生します。
この問題に対処するため、Deviseの初期設定ファイルconfig/initializers/devise.rbを以下のように編集します。
# config.navigational_formats = ['*/*', :html]
# ↓コメントアウトを外し、以下のように編集
config.navigational_formats = ['*/*', :html, :turbo_stream]
こうすることで、Turbo Stream 有効下の中でもDeviseを使うことができます。
Userモデルの作成
Deviseでは以下のコマンドでUserモデルを作成します。
$ rails g devise userUserモデルを作成すると、db/migrate以下にマイグレーションファイルが生成されます。
メール認証を追加したい場合は、ファイルを開いてConfirmableの箇所をコメントアウトしておきます(以下を参照)。
# frozen_string_literal: true

class DeviseCreateUsers < ActiveRecord::Migration[7.0]
  def change
    create_table :users do |t|
      ## Database authenticatable
      t.string :user_name
      t.string :email,              null: false, default: ""
      t.string :encrypted_password, null: false, default: ""

      ## Recoverable
      t.string   :reset_password_token
      t.datetime :reset_password_sent_at

      ## Rememberable
      t.datetime :remember_created_at

      ## Trackable
      # t.integer  :sign_in_count, default: 0, null: false
      # t.datetime :current_sign_in_at
      # t.datetime :last_sign_in_at
      # t.string   :current_sign_in_ip
      # t.string   :last_sign_in_ip

      # Confirmable ↓メール認証を利用する場合はコメントアウトを解除する
      t.string   :confirmation_token
      t.datetime :confirmed_at
      t.datetime :confirmation_sent_at
      t.string   :unconfirmed_email # Only if using reconfirmable

      ## Lockable
      # t.integer  :failed_attempts, default: 0, null: false # Only if lock strategy is :failed_attempts
      # t.string   :unlock_token # Only if unlock strategy is :email or :both
      # t.datetime :locked_at


      t.timestamps null: false
    end

    add_index :users, :email,                unique: true
    add_index :users, :reset_password_token, unique: true
    # add_index :users, :confirmation_token,   unique: true
    # add_index :users, :unlock_token,         unique: true
  end
end
編集が完了したら、以下のコマンドでマイグレーションを実行します。
$ rails db:migrateConfirmableを利用する場合は、モデルファイルに:confirmableを追記します。
class User < ApplicationRecord
  devise :database_authenticatable, :registerable,
         :recoverable, :rememberable, :validatable, :confirmable #←追記する
end
Viewファイルの追加
以下のコマンドを実行すると、app/views/deviseディレクトリ以下に各種Viewファイルが作成されます。
$ rails g devise:viewsviews以下のディレクトリをモデル名と同じ名称にしたい場合は、以下のコマンドを実行します。
$ rails g devise:views usersこうすることでapp/views/usersディレクトリ以下に各種Viewファイルが作成されます。
フォームのカスタマイズをする場合はこれらのファイルを編集します。
form_for を form_withに置き換える
Deviseで生成したViewのフォームヘルパーにはform_forが用いられていますが、Rails5.1以降はform_forとform_tagはform_withに統合されたため、form_withの利用が推奨されています(form_forは非推奨)。
今回は、form_forが使われている以下6つのViewに対し、form_forをform_withに置き換えていきます。
- views/devise/registrations/new.html.erb
- views/devise/registrations/edit.html.erb
- views/devise/sessions/new.html.erb
- views/devise/passwords/new.html.erb
- views/devise/passwords/edit.html.erb
- views/devise/confirmations/new.html.erb
registrations/new.html.erbおよびregistrations/edit.html.erbの場合は以下のように変更します。
# 変更前
= form_for(resource, as: resource_name, url: registration_path(resource_name)) do |f|
 ↓↓↓
# 変更後
= form_with model: @user, url: registration_path(resource_name), local: true do |f|sessions/new.html.erbの場合は以下のように変更します。
# 変更前
= form_for(resource, as: resource_name, url: session_path(resource_name)) do |f|
 ↓↓↓
# 変更後
= form_with model: @user, url: session_path(resource_name), local: true do |f|もうお分かりかもしれませんが、残りのpasswords以下とconfirmations以下のViewファイルも、上記のパターンに従って変更すればOKです。
フォームタグの中身は変更しなくて大丈夫です。

Controllerをカスタマイズ
Deviseをインストールすると、アプリケーションフォルダ内に「Devise用のコントローラー」がないことに気づくかと思います。
なぜかというと、Deviseは通常gem installされたファイル内のデフォルトのコントローラーを参照しているためです。
このコントローラーはgithub上のapp/controllers/deviseフォルダー内(こちら)で見ることができます。
Deviseのコントローラーをカスタマイズする場合は、まず以下のコマンドでDevise用のコントローラーをローカルにダウンロードし、オーバーライド&参照することで変更後のコントローラーを適用することができます。
$ rails g devise:controllers users

    ↓ 下記コントローラーが追加される
      create  app/controllers/users/confirmations_controller.rb
      create  app/controllers/users/passwords_controller.rb
      create  app/controllers/users/registrations_controller.rb
      create  app/controllers/users/sessions_controller.rb
      create  app/controllers/users/unlocks_controller.rb
create app/controllers/users/omniauth_callbacks_controller.rb今回は、Rails7でafter_sign_out_path_forが効かない問題とsign_up時のエラーが表示されない問題へ対処するために、
registrations_controller.rbとsessions_controller.rbの内容をオーバーライドしていきます。
registrations_controller.rbは、createアクションに以下の内容を記述します↓
# frozen_string_literal: true

class Users::RegistrationsController < Devise::RegistrationsController
  # before_action :configure_sign_up_params, only: [:create]
  # before_action :configure_account_update_params, only: [:update]

  # GET /resource/sign_up
  # def new
  #   super
  # end

  # POST /resource
  # createアクションを以下のように書き換える
  def create
    build_resource(sign_up_params)

    resource.save
    yield resource if block_given?
    if resource.persisted?
        if resource.active_for_authentication?
            set_flash_message! :notice, :signed_up
            sign_up(resource_name, resource)
            respond_with resource, location: after_sign_up_path_for(resource)
        else
            set_flash_message! :notice, :"signed_up_but_#{resource.inactive_message}"
            expire_data_after_sign_in!
            respond_with resource, location: after_inactive_sign_up_path_for(resource)
        end
    else
        clean_up_passwords resource
        set_minimum_password_length
        respond_with resource, status: :see_other # 登録失敗時のrespond_withにerror出したいので、ここで303 statusを追加
    end
  end

  # GET /resource/edit
  # def edit
  #   super
  # end

  # PUT /resource
  # def update
  #   super
  # end

  # DELETE /resource
  # def destroy
  #   super
  # end

  # GET /resource/cancel
  # Forces the session data which is usually expired after sign
  # in to be expired now. This is useful if the user wants to
  # cancel oauth signing in/up in the middle of the process,
  # removing all OAuth session data.
  # def cancel
  #   super
  # end

  # protected

  # If you have extra params to permit, append them to the sanitizer.
  # def configure_sign_up_params
  #   devise_parameter_sanitizer.permit(:sign_up, keys: [:attribute])
  # end

  # If you have extra params to permit, append them to the sanitizer.
  # def configure_account_update_params
  #   devise_parameter_sanitizer.permit(:account_update, keys: [:attribute])
  # end

  # The path used after sign up.
  # def after_sign_up_path_for(resource)
  #   super(resource)
  # end

  # The path used after sign up for inactive accounts.
  # def after_inactive_sign_up_path_for(resource)
  #   super(resource)
  # end
endsessions_controller.rbは、respond_to_on_destroyアクションを以下の通り追記します↓
# frozen_string_literal: true

class Users::SessionsController < Devise::SessionsController
  # before_action :configure_sign_in_params, only: [:create]

  # GET /resource/sign_in
  # def new
  #   super
  # end

  # POST /resource/sign_in
  # def create
  #   super
  # end

  # DELETE /resource/sign_out
  # def destroy
  #   super
  # end

 # ↓以下の内容を追記
  def respond_to_on_destroy
    respond_to do |format|
      format.all { head :no_content }
      format.any(*navigational_formats) { redirect_to after_sign_out_path_for(resource_name), status: :see_other }
    end
  end

  # protected

  # If you have extra params to permit, append them to the sanitizer.
  # def configure_sign_in_params
  #   devise_parameter_sanitizer.permit(:sign_in, keys: [:attribute])
  # end
end
ルーティング設定
このままではローカルに追加したコントローラーを参照しないので、参照するようルーティング設定を行います。
devise_for :usersの後に、以下のように参照するコントローラー名を記述します↓
Rails.application.routes.draw do
  root "home#top"
  devise_for :users, controllers: {
    # ↓ローカルに追加されたコントローラーを参照する(コントローラー名: "コントローラーの参照先")
    registrations: "users/registrations",
    sessions: "users/sessions",
    passwords: "users/passwords",
    confirmations: "users/confirmations"
  }
end
これで、ローカルに追加されたコントローラーを参照するようになります。
SendGrid メールサーバーの設定(Confirmableを有効にする場合)
メール認証(Confirmable)を有効にした場合、メール送信用のメーラーが必要になってくるかと思います。
代表的なメーラーとしてGmailやSendGridなどが挙げられますが、ここではSendGridのメールサーバー設定について解説します。
なお、SendGridを利用する場合は事前にアカウント登録しておく&APIキーを取得しておく必要があります。
SendGridのアカウント登録およびAPIキー取得方法についてはこちらの①と③をご確認ください。
(Gmailで設定したい場合は、アプリパスワード取得方法、およびメールサーバー設定でそれぞれ確認してください)
dotenv-railsの導入
メールサーバーの設定では、SendGridで取得したAPIキーを設定しますが、APIキーをそのまま設定ファイルに入力するのはセキュリティ上好ましくありません。
(SendGrid側も、生のパスワード使用を禁止しているみたいです)
アプリ内でAPIキーを使用する場合は、取得したAPIキーを環境変数として設定する必要があります。
以下、追加するGemはそのために必要なライブラリです。
gem 'dotenv-rails'Gemを追記したら下記コマンドでインストールします。
$ bundle installAPIkey, Passwordなどを環境変数として設定(開発環境用)
アプリケーションフォルダ直下に.envという名前のファイルを新規作成し、SendGridで取得したAPIキーを以下のように追加します。
# SendGridのAPIキー
SENDGRID_API_KEY = "SendGridのAPIキー"また、APIキーをgithub上にアップしてしまわないように、.gitignoreに以下の1行を追記します。
/public/assets

# Ignore master key for decrypting credentials and more.
/config/master.key

# ↓最下部に追記
/.env
環境設定にメールサーバーの情報を記述
開発環境の場合、config/environments/development.rbに以下のように記述します。
 # SendGrid用のメールサーバー設定(開発環境)
  config.action_mailer.perform_caching = false
  config.action_mailer.default_url_options = { host: 'localhost', port: 3000 }
  config.action_mailer.raise_delivery_errors = true
  config.action_mailer.delivery_method = :smtp
  config.action_mailer.smtp_settings = {
    :address => 'smtp.sendgrid.net',
    :port => 587,
    :domain => 'localhost',
    :user_name => 'apikey',
    :password => ENV['SENDGRID_API_KEY'],
    :authentication => :plain,
    :enable_starttls_auto => true
}:password欄には環境変数として設定したAPIキーENV['SENDGRID_API_KEY']を挿入します。
本番環境(Heroku)の場合はconfig/environments/production.rbに以下のように記述します。
 # SendGrid用のメールサーバー設定(本番環境→Heroku)
  config.action_mailer.default_url_options = { host: 'https://Herokuのアプリ名.herokuapp.com' }
  config.action_mailer.raise_delivery_errors = true
  config.action_mailer.delivery_method = :smtp
  config.action_mailer.perform_deliveries = true
  config.action_mailer.default :charset => "utf-8"
  config.action_mailer.smtp_settings = {
    :address => 'smtp.sendgrid.net',
    :port => 587,
    :domain => 'heroku.com',
    :user_name => 'apikey',
    :password => ENV['SENDGRID_API_KEY'],
    :authentication => :plain,
    :enable_starttls_auto => true
  }
また、本番環境(Heroku)でも環境変数を利用できるようにするため、Heroku側で環境変数の設定を行います。
Herokuの対処アプリのSettingタブ > Config Varsへ進み、以下のように環境変数のキーと値を入力します。
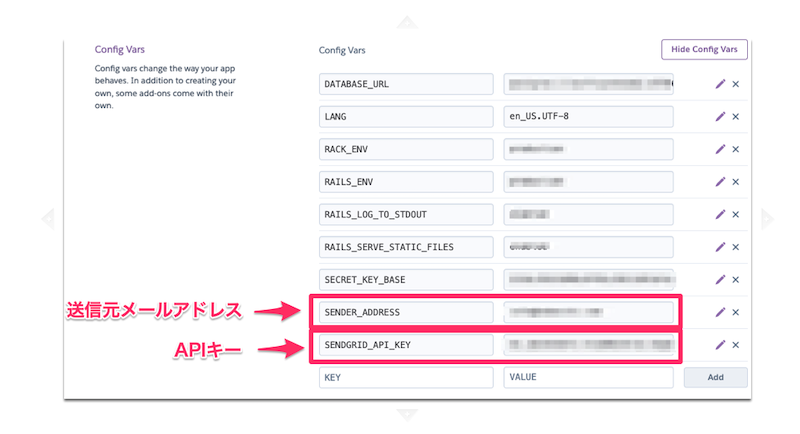
これでメールサーバーの設定は完了です。
ただし、SendGridの場合はアプリ側で「メールの差出人情報(送信元メールアドレス)」の設定もする必要があります。
(SendGridのアカウント作成後、送信元メールアドレスの登録&認証を済ませておく必要があります。送信元メールアドレスの登録&認証方法はこちらの②をご確認ください)
メールの差出人(送信元)情報の設定
送信元メールアドレスも環境変数として設定しておきたいので、
.envファイルを開き、SendGridで事前に認証済みの送信元メールアドレスを追記します。
# SendGridのAPIキー
SENDGRID_API_KEY = "SendGridのAPIキー"

# 送信元のメールアドレス(↓追記)
SENDER_ADDRESS = "送信元のメールアドレス"次に、app/mailers/application_mailer.rbのdefault from:欄に先ほど環境変数として設定した送信元メールアドレスENV['SENDER_ADDRESS']を追記します。
class ApplicationMailer < ActionMailer::Base
  default from: ENV['SENDER_ADDRESS']
  layout "mailer"
endまた、config/initializers/devise.rbのconfig.mailer_senderの箇所をコメントアウトし、以下のように編集します。
Devise.setup do |config|
  ・・・
  # config.mailer_sender = 'please-change-me-at-config-initializers-devise@example.com'
  # ↓以下のように変更
  config.mailer_sender = ENV['SENDER_ADDRESS']
 ・・・
end
これで、アプリケーション側からメールが送信できるようになるはずです。
実際にDeviseのメール認証(sign_upなど)でメール送信できるかテストしてみてください。
エラーメッセージ表示用のタグをapplication.html.erbに埋め込む
application.html.erbの任意の場所に以下のタグを挿入します。
<p class="notice"><%= notice %></p>
<p class="alert"><%= alert %></p>
これで、タグを挿入した箇所にDeviseの確認メッセージ、およびエラーメッセージが表示されるようになります。
Deviseの各種メッセージを日本語化する
Deviseの確認メッセージおよびエラーメッセージはデフォルトで英語なので、これらを日本語化します。
まず、config/application.rbに下記のコードを記述。
config.i18n.default_locale = :ja
config.time_zone = "Tokyo"次にconfig/locales内にdevise.ja.ymlおよびja.ymlファイルを作成します。
作成したファイルに翻訳データをコピーします。
devise.ja.ymlの翻訳ファイルはこちらから、ja.ymlの翻訳ファイルはこちらからそれぞれコピペします。
以上でDeviseの導入は完了です。
お疲れ様でした。
参考資料

コメント