Railsを使って自作ブログを作ろうと思い立ったので、まずはブログにとって必要不可欠なリッチテキストエディタを導入しようということで、、
今回はRails6からデフォルトで組み込まれているAction Textを使ってリッチテキストエディタを導入してみました。
Action Textはシンプルゆえに簡単に導入、運用できるのがメリット。
当記事はAction Text導入の流れを記したメモ書きになります。
Action Textの導入を検討されている方の参考になれば幸いです。
開発環境
- Ruby 3.1.2
- Ruby on Rails 7.0.4
- tailwindcss 3.1.8
- M1 Macbook Air 2020
- mac OS Monterey (ver. 12.4)
- ターミナル bash (Rosetta 2 使用)
出来上がりイメージ
以下、Action Textを導入後の動作イメージです。
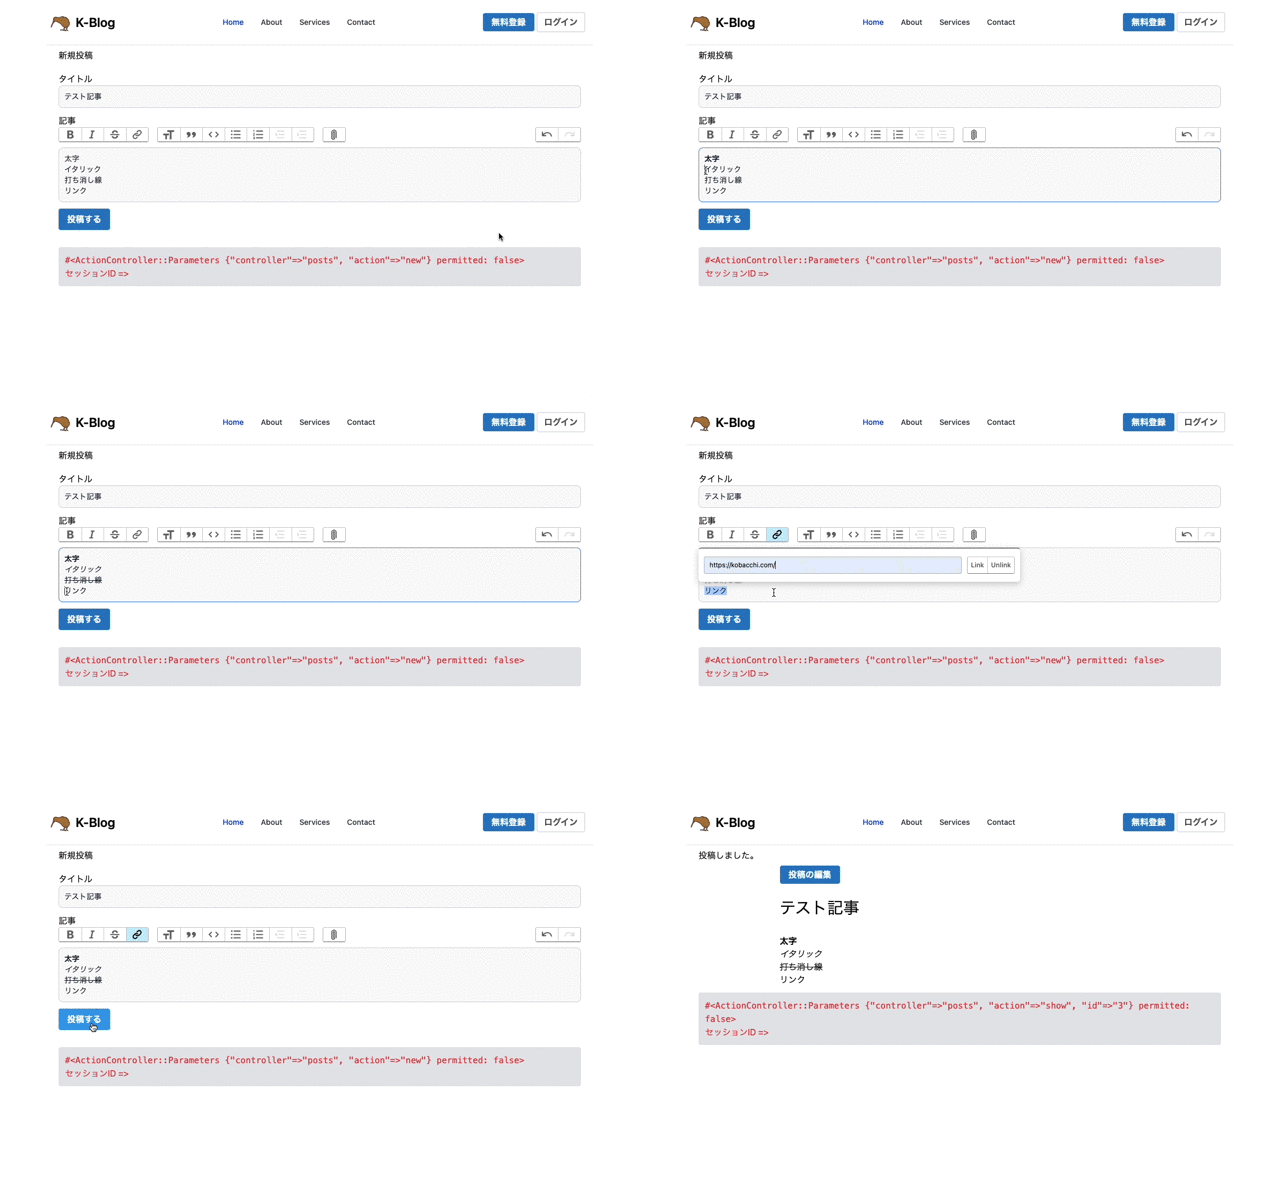
Action Textの文字装飾は基本的に「太字」「イタリック文字」「打ち消し線」「リンク」の4種類のみで、この他「見出し」「引用」「コード」「リスト」「番号付きリスト」「ファイル添付」などのタグを付けることができます。
リッチテキストエディタにしては文字装飾が少なく、デフォルトでは「文字サイズ」や「文字色」の変更ができないのが残念。
調べてみたら、カスタマイズすれば文字サイズや文字色を変更するためのタグを追加できるみたいですが、結構大変みたいです(気が向いたら取り組んでみようw)。
まぁ、シンプルなブログを作るならこれくらいがちょうどいいかもしれません。
個人的に便利だなと思った機能が添付ファイル(画像)の挿入タグです。
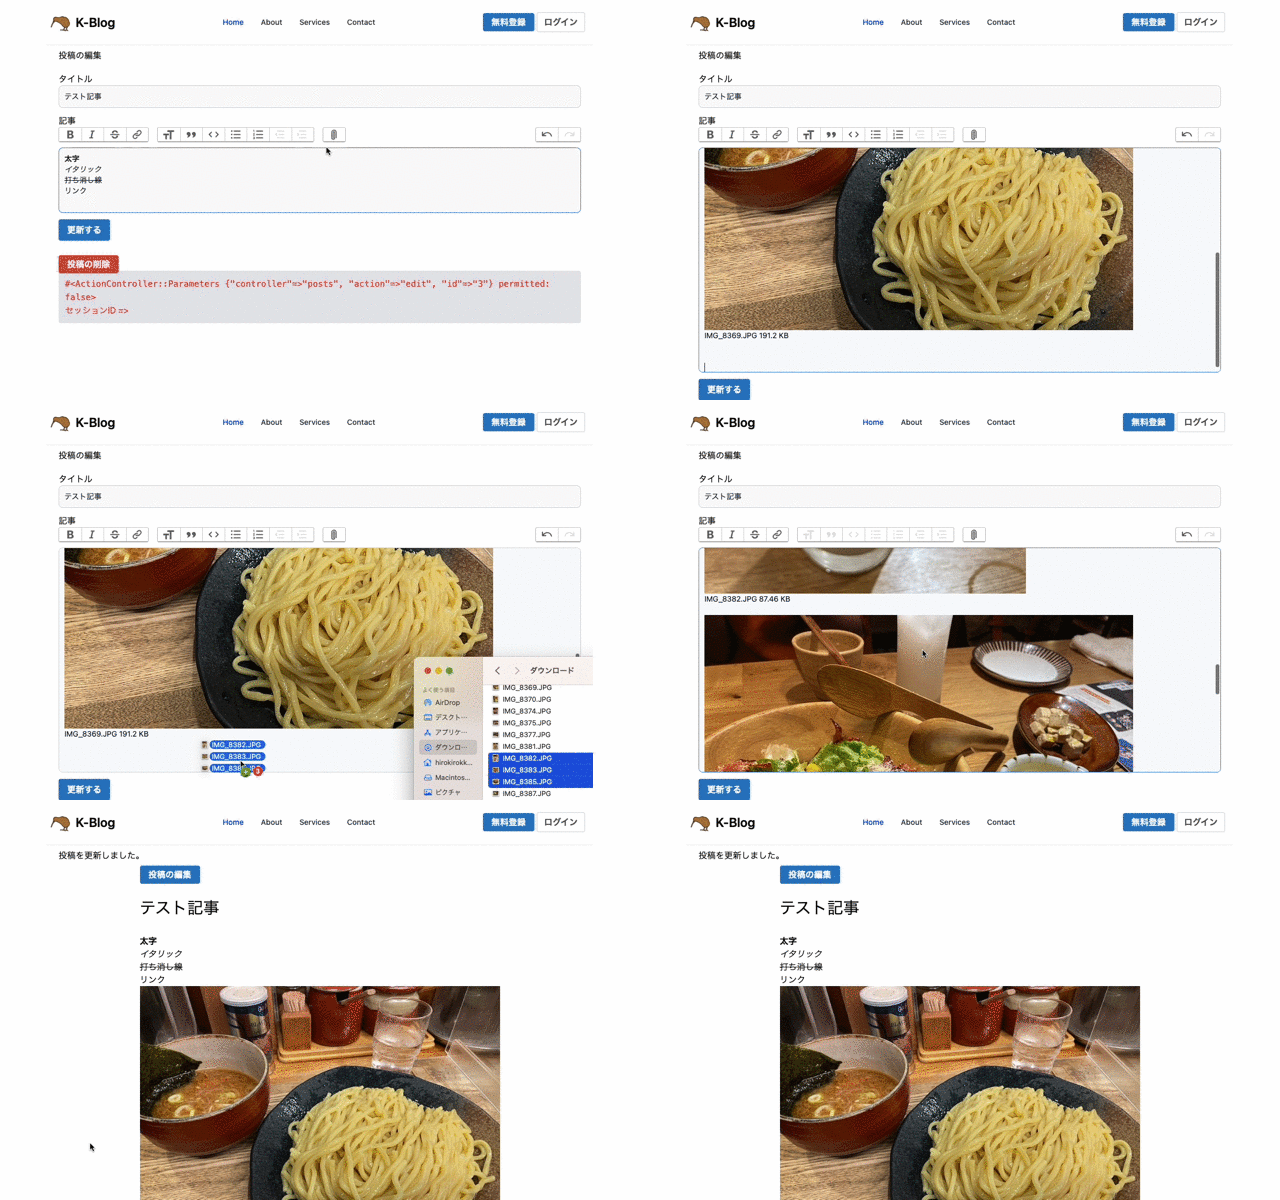
なんと、こちらドラッグ&ドロップでもファイルをアップロードできます。
もちろん、挿入した画像(プレビュー画像)の削除も可能です。
これは便利ですね。
Action Text 導入の流れ
Postモデルを作成する
まずは以下のコマンドで記事投稿用の雛形(Postモデル)を作成します。
$ rails g scaffold Post title:stringここで、contentカラムを追加していない理由ですが、Action Textを導入すると Action Text側で用意されたcontentカラムに記事を保存してくれるため、わざわざこちらでcontentカラムを作る必要がないのです。
マイグレーションを実行し、データベースに反映させます。
$ rails db:migrateAction Textのインストール
以下のコマンドでAction Textをインストールします。
$ rails action_text:installこちらも同様にマイグレーションを実行しデータベースに反映させます。
$ rails db:migrateモデルの編集
app/models/post.rbに以下のように記述します。
class Post < ApplicationRecord
  has_rich_text :content
end
コントローラーの編集
app/controllers/post_controller.rbのストロングパラメータに:contentを追記します。
class PostsController < ApplicationController
    ・
    ・
 (省略)
    ・
    ・
  private
    def post_params
      params.require(:post).permit(:title, :content)
    end
end
投稿画面(_form.html.erb)の編集
投稿画面のフォームを以下のように編集します。
<%= form_with model: @post, class: "bg-white py-5 rounded-md trix-content" do |f| %>
  <div class="mb-3">
    <%= f.label :title, "タイトル" %>
    <%= f.text_field :title, class: "bg-gray-50 border border-gray-300 text-gray-900 text-sm rounded-lg focus:ring-blue-500 focus:border-blue-500 block w-full p-2.5  dark:bg-gray-700 dark:border-gray-600 dark:placeholder-gray-400 dark:text-white dark:focus:ring-blue-500 dark:focus:border-blue-500"  %>
  </div>
  <div class="mb-3">
    <%= f.label :content, "記事" %>
    /********* ↓ f.text_areaを「f.rich_text_area」に書き換える ***********/
    <%= f.rich_text_area :content, class: "bg-gray-50 border border-gray-300 text-gray-900 text-sm rounded-lg focus:ring-blue-500 focus:border-blue-500 block w-full p-2.5  dark:bg-gray-700 dark:border-gray-600 dark:placeholder-gray-400 dark:text-white dark:focus:ring-blue-500 dark:focus:border-blue-500" %>
    /*****************************************************/
  </div>
  <div class="mb-3">
    <%= f.submit @post.new_record? ? "投稿する" : "更新する", class: "font-semibold py-2 px-4 rounded text-white bg-sky-600 hover:bg-sky-500 cursor-pointer" %>
  </div>
<% end %>
記事表示画面(show.html.erb)の編集
表示画面show.html.erbに<%= @post.content %>を追記することで投稿内容が反映されます。
<div class="mb-3 max-w-2xl text-left mx-auto">
  <div class="my-8 text-3xl">
    <h1><%= @post.title %></h1>
  </div>
  <div class="mb-3 post-content">
    <%= @post.content %>
  </div>
</div>
これで、一通りの作業が終わりました。
しかし、このままだともし画像を挿入した場合、投稿記事上で画像が表示されません。

画像を表示させるための手順は次の章でお話しします。
画像を表示させる手順
Action Textで挿入した画像を、投稿した記事上で表示させるためにはimagemagickのインストールが必要です。
以下のコマンドを実行し、imagemagickをインストールします。
$ brew install imagemagick続いて、Gemfileに以下のgemを追記します(image_processingはコメントアウトを解除する)。
gem "image_processing", "~> 1.2"
gem "mini_magick"
以下のコマンドを実行しインストールを完了させます。
$ bundle installconfig/application.rbに以下の設定を追記します。
require_relative "boot"

require "rails/all"

# Require the gems listed in Gemfile, including any gems
# you've limited to :test, :development, or :production.
Bundler.require(*Rails.groups)

module Devise704Tailwind
  class Application < Rails::Application
   ・・・
    ### ↓ 以下の1行を追加
    config.active_storage.variant_processor = :mini_magick
  end
end
これで投稿記事上で画像が表示されるようになればOKです。
画像のキャプションを消す方法
Action Textで画像をアップロードすると、保存後の記事の画像にキャプション(画像名)がそのまま表示されてしまう。

画像名がそのまま表示されないようにするためにはキャプションに何か書き込む必要がありますが、そもそもキャプションがいらない場合はどうすれば良いのか。
解決策は簡単で、app/views/active_storage/blobs/_blob.html.erbの中の以下の部分を削除、もしくはコメントアウトすればOKです。
<figure class="attachment attachment--<%= blob.representable? ? "preview" : "file" %> attachment--<%= blob.filename.extension %>">
  <% if blob.representable? %>
    <%= image_tag blob.representation(resize_to_limit: local_assigns[:in_gallery] ? [ 800, 600 ] : [ 1024, 768 ]) %>
  <% end %>

<!-- この部分を削除、もしくはコメントアウト
  <figcaption class="attachment__caption">
    <% if caption = blob.try(:caption) %>
      <%= caption %>
    <% else %>
      <span class="attachment__name"><%= blob.filename %></span>
      <span class="attachment__size"><%= number_to_human_size blob.byte_size %></span>
    <% end %>
  </figcaption>
-->
</figure>
このコードが画像のキャプションを表示する部分に該当します。
これで以下のようにキャプションが表示されなくなります。

もしくは、以下のように編集してもいいかもしれません。
<figure class="attachment attachment--<%= blob.representable? ? "preview" : "file" %> attachment--<%= blob.filename.extension %>">
  <% if blob.representable? %>
    <%= image_tag blob.representation(resize_to_limit: local_assigns[:in_gallery] ? [ 800, 600 ] : [ 1024, 768 ]) %>
  <% end %>

<!-- キャプションが入力された場合のみ表示 -->
  <figcaption class="attachment__caption">
    <% if caption = blob.try(:caption) %>
      <%= caption %>
    <% end %>
  </figcaption>
</figure>
この場合、キャプションが入力された場合のみ表示されるようになります。
(ただし、一度キャプションを入力するとなぜか変更ができない。。バグなのか仕様なのか不明。解決できたら追記します)
参考資料






コメント